Showing posts with label Makeup. Show all posts

Sunday, April 26, 2015

Hot Hot Heat: 5 Steps to Melt-Proof Makeup

Hot Hot Heat: 5 Steps to Melt-Proof Makeup

In my opinion, there is nothing worse than looking in the mirror halfway through the day only to find your makeup running down your face.
So, with what seems like half the population headed to the desert this weekend for Coachella, I thought I’d share a few tips for keeping your makeup in place.
Whether you’re going to Coachella or preparing for an upcoming summer getaway, it’s important to adjust your beauty routine as the temperature starts to rise. Luckily, there are a few steps you can take to ensure that your makeup won’t cake and your mascara won’t run—even in the hot-and-stickiest of weather. Here are my 5 melt-proof makeup tips:
1. Prep with primer. For a fresh and dewy complexion that truly lasts all day, always prep with primer before applying foundation. Look for a primer that contains silicone (the key ingredient in most long-wearing formulas), which will act as a barrier between humidity and your skin.
2. Choose a silicone-based foundation. As with primers, silicone-based foundations are truly the longest wearing and the very best option when met with moisture.
3. Cream, please. Play off the heat and use a cream shadow and cream-based blush instead of powder versions. Cream products give you a nice, natural looking glow and they won’t get cakey. Look for long-wear versions for added insurance.
4. Use a waterproof concealer. If mascara is the only waterproof product in your makeup bag, then it’s time to do a little shopping. A densely pigmented, waterproof concealer will hide dark circles and blemishes, even in extreme heat.
5. Mind your lashes. For lush lashes and liner that won’t run, use a waterproof liquid liner and waterproof mascara. Raccoon eyes are never a cute look.
Bonus tip: Since heat and humidity usually entails sun, don’t forget the SPF! I also always keep some blotting papers in my bag to deal with shine. If you start to sweat, piling on more powder will only look cakey.

Blogger : Sunrise
Photo : source


Beauty School: The Beauty Guru's Guide to Concealer

Beauty School: The Beauty Guru's Guide to Concealer

When most people think of camouflage, they probably picture the splotchy green fabric used to make a traditional army uniform (it also tends to make a fashion comeback every few years). But camouflage can come in many different forms. You can camouflage a scuff on your favorite pair of black heels using a black permanent marker. And, when it comes to beauty, you can camouflage just about any blemish or imperfection that comes your way. All you need is the right kind of concealer, and a few tips for how to apply it. And that’s where I come in… Today I’m going to be sharing my expert guide to using concealer the right way, in all the right places.
I will be teaching you about five different zones that require concealing, along with the steps you’ll need to follow to make your face look flawless. Here is my guide to “camouflaging” like a beauty guru...
How to Conceal Under-Eye Circles: The most important thing to remember when attempting to hide those under-eye bags is that your goal is to make your eyes look brighter. That said, I recommend using a brightening concealer, a beauty blender or sponge, and loose highlighting powder. I also recommend that you use a concealer that’s oil-based for under your eyes because you want to keep the delicate skin in this area hydrated and moisturized. You will also want to use a peach or pink-based concealer to counteract the blue tones of your dark eye circles. Here’s how to do it:
  1. Apply your brightening concealer by dotting it in a line under your eye, starting at the inner corner (the inside of the bridge of your nose) and working to the outer edge of your eye.
  2. Get your sponge or blender a little bit damp, then dip it into your loose highlighting powder. Dab it over the concealer, blending it evenly into your skin.
  3. Brush a tiny bit of the highlighting powder under your eye to make sure it sets and doesn’t crease.
Expert Tip: If prefer to use your finger to apply concealer under your eyes, use your non-dominant ring finger. Since it’s weaker than your pointer finger, this will keep you from tugging too hard on the delicate skin under your eyes. Products I recommend: bareMinerals Stroke of Light Eye Brightener, $22 Beauty Blenders, $28.95 Too Faced Candlelight Glow Highlighting Powder Duo, $30 How to Cover Up Scars or Dark Spots If you experience discoloration or uneven skin tone, these concealer tips will come in handy. You can also use this method for covering up scars on your face. You will want to invest in a heavier concealer for these areas because the thicker texture contains less oil and lasts longer. You will also need lifting concealer, a beauty blender or sponge, and translucent powder. Here’s how to do it:
  1. Apply your heavier concealer with a brush, covering the problem area entirely.
  2. Dab a coat of lifting concealer over the area to make the dark spot brighter. If you’re dealing with a scar, you might not need this step.
  3. Dampen your beauty blender or sponge and dip it into loose powder. Blend the area in evenly.
  4. Finish with a translucent mineral powder to set the area.
Products I recommend: DiorSkin Sculpt Lifting Smoothing Concealer, $36 Beauty Blenders, $28.95Laura Mercier Loose Setting Powder, $35 How to Hide Blemishes When you want to cover up a blemish that is red (and probably pesky too), using a green concealer will help to neutralize the color and hide the inflammation. To do this, you will need a green concealer (I recommend using one in a jar or tube), a concealer brush, a concealer stick, a blending brush, and loose powder. Here’s how it works:
  1. Take a concealer brush and load it up with the green concealer. Start applying it on the pimple, starting in the middle and making light brush strokes outward. You want it to fade into your skin, with the most concentrated area being the middle of the blemish.
  2. Making sure your index finger is completely clean, dab it on the concealer stick and apply to the blemish. Apply in a patting motion, until the area is completely covered and skin tone looks even.
  3. Dip your blending brush in loose powder, then lightly dust the powder onto your skin, blending all three products together.
Products I recommend: NYX Concealer Jar in Green, $5 Stila CC Color Correcting Stick Broad Spectrum, $38 The Balm Concealer Brush, $8 Urban Decay Good Karma Blending Brush, $26 Clinique Blended Face Powder, $23 How to Apply Concealer Around the Nose It’s very common to have redness or small broken veins in the area around your nose. This is also generally a much oiler area on your face, so it requires a concealer method that’s simple but a little bit different than the rest of your face. All you will need is a cream concealer (the less oily, the better), a beauty blender or sponge, and loose powder. And remember, a green concealer will neutralize any redness in this area—but only use it if you really feel you need it. Here are the three easy steps:
  1. Using your finger, dip it into your cream concealer. Pat it on the skin around your nose, covering it completely and fading outward to your cheeks.
  2. Take a damp beauty blender or sponge and blend the concealer into your skin.
  3. Dust loose powder over the area to set it.
Products I recommend: Bobbi Brown Creamy Concealer Kit, $33 Beauty Blenders, $28.95 bareMinerals Broad Spectrum Multi-Tasking Face Powder, $18 How to Conceal Puffiness For those days when your skin just doesn’t feel as smooth and supple as you’d like, you will want to use this method to conceal puffiness. If I notice puffiness, it’s around the outer corners of my eyes, on my eyelids, or on my brow bones (it’s usually my skin telling me to get more sleep). Before applying any makeup, drink up—two glasses of water will help your skin more than any concealer. Then, use a yellow-toned or brightening concealer to highlight these areas and keep your skin looking fresh. You will need a hydrating moisturizer, liquid concealer, and a bit of highlighter. Here’s how to de-puff:
  1. Create a mixture using your moisturizer, your liquid concealer, and a bit of highlighter.
  2. Using a concealer brush, dab the mixture on the puffy areas of your face.
  3. Wipe your concealer brush clean of the mixture, then use it to blend the concealer in evenly.
Products I recommend: Neutrogena Oil Free Moisturizer with SPF 15, $10 Stila Perfecting Concealer, $23 Estée Lauder Concealer Brush, $22 Benefit High Beam Liquid Highlighter, $26 Now that you have all the steps for covering every imperfection you might encounter, here’s a short guide that might come in handy when color correcting with concealers…

Color Correction Guide

Green concealer is a great color corrector for neutralizing blemishes, covering up redness, and canceling out any rosy area on your face (rosacea, scars, etc.) Pink concealer will help to brighten any dull areas of your skin and hide signs of fatigue. Use this color corrector to hide dark circles, bruises, or to give your entire face a little boost. Yellow concealer is great for evening out your skin tone and making it look fresh with minimal effort. This is also a great color to use for a base on your eyelids, brow bone, or cheekbones before you apply the rest of your makeup. Well, I think that about covers it (pun intended). I hope you found this guide to concealer useful. Make sure to bookmark it or pin the image above so that you can come back and read these facts whenever you need them.

Blogger : Sunrise
Photo : source


Ten: Overnight Beauty Tips

Ten: Overnight Beauty Tips

Sleeping Beauty had the right idea…after all, who doesn’t want to sleep for a hundred years and wake up looking flawless? Though Aurora’s story may be a fairytale, there’s still hope for those of us living in the 21st century. Today, I’m sharing 10 overnight beauty tips that will help you wake up with soft skin, bright eyes, perfect waves and more. The best part? All of the magic happens while you slumber, giving a whole new meaning to the term “beauty sleep.”  Read on for a few of my favorite overnight beauty tips that will have you feeling like Sleeping Beauty come sunrise…
1.) Soften
For a pampering overnight treatment, apply Vaseline to the soles of your feet and put on socks before you sleep. The socks help bind the moisture to your feet and you’ll wake up to soft, smooth soles. Now all you need is a pair of strappy heels to show them off…
2.) De-puff

If you constantly wake up with puffy, swollen eyes, try this simple switch: Add an extra pillow and sleep on your back. This will allow the fluids around your eyes to drain easier and keep the puffiness to a minimum.  And of course, don’t forget your eye cream. Look for creams that list caffeine as one of the ingredients—it will help keep fluids moving.
3.) Create waves

To wake up with perfect waves, simply shower at night and style your hair before bed. Allow your strands to air dry until they’re damp, and run some light styling crème through with your fingers. Depending on your hair type and what kind of waves you prefer, you can either sleep in braids or twist your hair into buns. Don’t be afraid to experiment! Bed head has never looked so good.
4.) Moisturize

Ladies with dry skin, take note: A humidifier might just change your skin forever. Turn one on before you sleep (this works best during colder months when the air is drier) and let it work its magic. It instills the air with moisture, which in turn helps plump your skin and keep it hydrated.
5.) Prevent wrinkles
Sleeping on a cotton pillowcase can cause creases on your skin and create wrinkles. Instead, pamper yourself by investing in a silk or satin one. It will lessen the pressure on your skin and help prevent hair breakage.
6.) Whiten teeth
For an easy DIY whitening treatment, try brushing some baking soda to your pearly whites right before bed. Leave the mixture on for 5-6 minutes and make sure to rinse thoroughly afterwards. This is a perfect PM beauty treatment because in the waking hours, you would normally have to wait about 50 minutes before eating or drinking anything afterwards. Just make sure you are only doing this once a week; any more, and the acid in baking soda can wear down your tooth enamel.
7.) Brighten

It’s best to apply any face products that have brightening ingredients like retinol and vitamin C in them at night. Sunlight can actually deactivate them and prevent them from working to their fullest potential.
8.) Lengthen lashes
Give your fluttery fringe some loving with a DIY lash lengthening treatment. The secret ingredient? Castor oil. This natural oil is rich in super-hydrating omega-6 fatty acids, which help moisturize your lashes and prevent breakage. Using a clean spoolie, gently brush the castor oil through your lashes each night. In the morning, just rinse with warm water and wash your face as usual. You should notice healthier lashes in just a few weeks!
9.) Repair

Smooth a leave-in conditioner into your locks before you snooze to wake up to shiny, soft strands. Applying it in the evening gives treatment more time to penetrate into your hair cuticles for optimum moisture. (For a great natural alternative, try coconut oil.)
10.) Smooth

Nail beds looking dry? Apply cuticle cream or oil before you sleep and slip on gloves afterwards. You’ll wake up to healthy, hydrated nail beds. Now you just have to decide on the perfect polish color…

Blogger : Sunrise
Photo : source


Simple Smokey Eye Tutorial

Simple Smokey Eye Tutorial

One of my favorite looks is the Rock look. I mean, who doesn’t love a smokey, dark eye? The thing is, for every day life, or even a hot night out, the typical ‘rock’ look might be a little too much. So I’ve created a tutorial for you that creates the rock look you saw at the Grammy’s all the while making it something you can ‘rock’ any time!
The best part about this look, also what makes it easy, is the eye shadow palette. The shadows in this baby are superb. I mean, just a tiny touch on your brush and you’ve got enough for the look. It’s really high intensity, it goes on smooth, and lasts all day. Love it.

  • Eye liner & Brow pencil: These Bombshell Pow-Der BROW + Liner are amazing!! I haven’t always been a fill in the eye brow kinda gal until lately and it makes a huge difference! Specially with a smokey eye since it’s the main focal point for the look. The liner goes on smooth, but is great for beginners because it doesn’t have to be perfect. It’s more of a soft, smokey eye which is what we’re going for!
  • Full Lash Bloom Mascara: What I love about this mascara is that it really separates the lashes while you’re applying it. I don’t like the clumpy mascara look so this is perfect!
  • Outlast Lip Color: Going for a night out? You need your lipstick to last all day, don’t you? This stuff is incredible. Don’t apply it if you don’t want to wear it all day. It really, really lasts. I chose a very light neutral pink since we were doing the smokey eye so that it was a nice touch without being too much. And it really did last all day!
  • Eye shadow quad: The COVERGIRL quad makes this look so simple. All you really have to do is follow the instructions. No multiple palettes to search for the best colors or which shade goes with what. I also love the high intensity. I have used some high end products before that didn’t have the same intensity! That’s why I say that you don’t always have to spend more to get a good product.
You can find all four of these products at ULTA at the same great prices COVERGIRL is known for!

Before I start explaining, I thought I’d share a close up picture of the palette and the colors I used wear. I thought that’d be easier than me just referring to a color. So when I say “light color onto the lid” you know which one in the palette I’m referring to. I hope that makes sense!


  • Start with the lightest color all over the lid as a base
  • With a crease brush, get the darkest color and create a small “V” in the very outer corners. Avoid bringing this in too far, keep the dark colors on the outside.
  • With a curved brush, take some of the light brown and apply to above the dark color you just added onto your brow bone. You can bring this color from the outside brown bone to about 3/4 quarters of the way in. Keep it lighter towards the inside.
  • With a curved brush again, grab the darker shimmer color and apply this directly into the crease. Keep this color mainly towards the outer corner but you can bring it a littler farther inside, maybe half way.
  • With a regular flat brush and the same light color you started with apply it to the inside of the eye, blending out with the others and all the way up to under your eye brows. This brightens up the inside of your eye and doesn’t make the smokey eye too dark.
  • Apply the POW-Der eye liner along the last line on top and about a third of the way in on the bottom.
  • You can use the same POW-Der liner, or a lighter version, depending on your skin tone and hair color, and fill in your eye brows.
  • Apply two coats of the Full Bloom mascara to complete your look!
  • To finish off this smokey eye look, add the Outlast Lip color. It’s long-lasting and still doesn’t feel dry so you truly can wear it all day! I chose a light shade of pink because I wanted the smokey eye to steal the show.

  • Blogger : Sunrise
    Photo : source


    MAKE YOUR OWN NAIL WRAPS!

    MAKE YOUR OWN NAIL WRAPS!

    I recently Discovered this nail trick, and I seriously think it's going to revolutionize my nail art from now on. If you're not the best at painting your nails with a steady hand, why not just make your own nail wraps and forget about trying to master the brush !?


    All you need are some polishes and a plastic bag. You can use waxed paper or Also anything with a glossy surface.

    On your plastic, paint the general shape of the nail. Try to keep the polish thick so it's easier to peel off later.

    Let que dry and add your own nail art. I Decided on some easy polka dots and flowers. You'll need to let your finished creations dry for about an hour or so.

    Paint your nails a solid color. Once dry, grab some tweezers and gently peel the nail sticker off of the plastic. It shouldnt come off fairly easily. Position on your nail.


    Using your finger or a nail tool, press the onto your nail design and smooth it out ... just like you would with a store-bought nail wrap!

    If you need to, you can "cut" off the excess wrap with a nail tool wooden or just use some nail polish remover on a q-tip or brush.

    Finish by applying a clear top coat, and you're done!

    Blogger : Sunrise
    Photo : source


    EASY BLACK SMOKEY EYE TUTORIAL

    EASY BLACK SMOKEY EYE TUTORIAL

    One of my first makeup tutorials, "9 Step Dark Smokey Eye Tutorial" is still one of my most viewed posts after two years. It's bothered me for way too long that the photos are so crappy.... and seriously, what was up with my eyebrows?!  I wanted to give that tutorial a bit of a makeover itself because I'm a sucker for freshness and a bit of a compulsive updater. This weekend I was finally able to recreate the look for you in picture form. I also simplified things. I hope you like it and give it a try!

    This tutorial is probably one of the easiest makeup looks you can accomplish. One colour, and lots of blending. I skipped out on lining my eyes this time around because you really don't need to with this look. Scroll down for instructions. (If you're looking for something more natural and fast, try my 5 minute makeup tutorial!)


    SMOKEY EYE HOW TO:
    Step 1: Fill your entire lid with a black eyeliner. This helps intensify the smokiness and makes your shadow stay put longer.

    Step 2: Pat a black eyeshadow on top of the liner

    Step 3: Gently drag the colour into your crease and blend. Use short upwards stroke motions.

    Step 4: With a larger -- clean -- blending brush, continue gently blending out the edges, getting rid of that harsh line.

    Step 5: Concentrate blending the shadow outwards at the outer corner of your eye and the inner corner (up towards your eyebrow). You can add a bit more shadow to darken.

    Step 6: Apply the same black shadow under your waterline, blending downwards

    Step 7: This is the finished blending

    Step 8: Apply mascara to top and bottom lashes

    Products used:
    Black shadow from the 88 Palette
    Eyeliner by Rimmel
    Extra Wow Lash mascara by Rimmel


    Blogger : Sunrise
    Photo : source


    TAYLOR SWIFT INSPIRED MAKEUP TUTORIAL

    TAYLOR SWIFT INSPIRED MAKEUP TUTORIAL

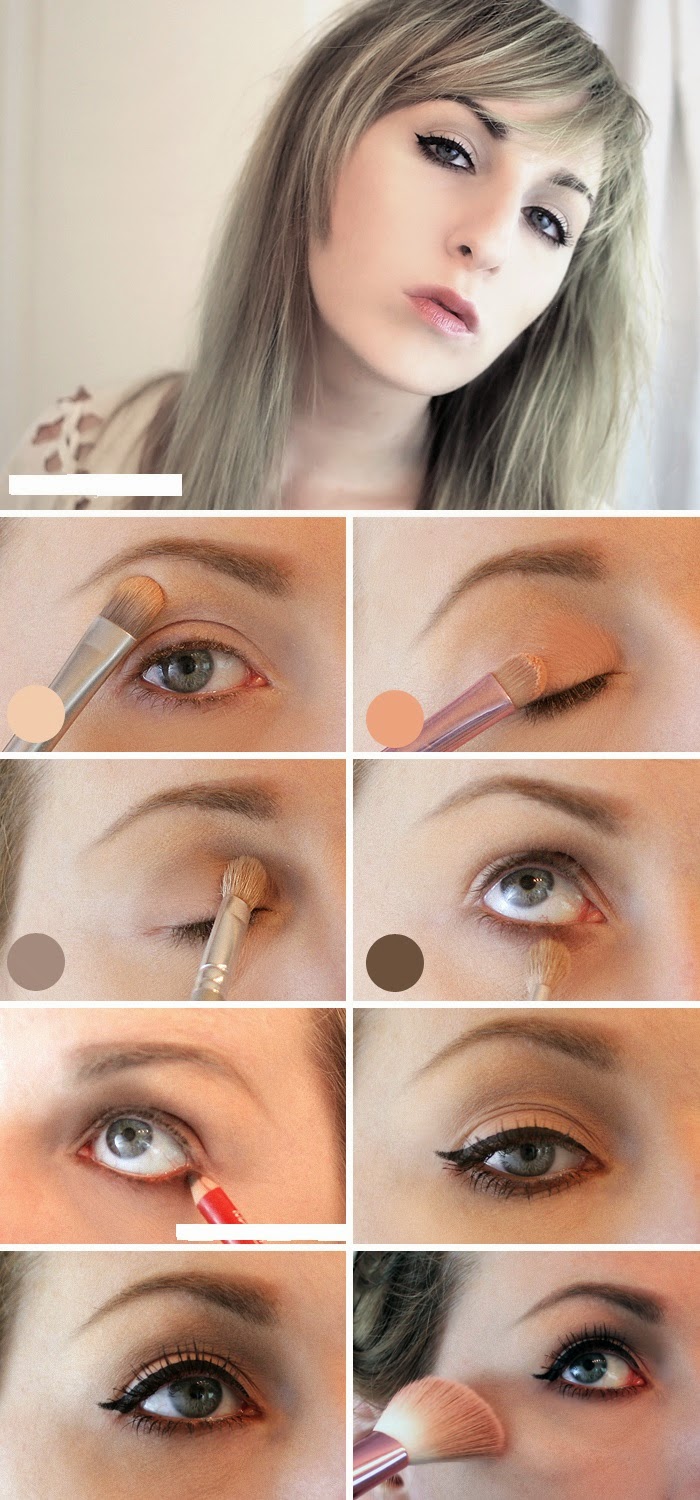
    Hey friends, I hope you had a good weekend. I've got another makeup tutorial I wanted to share with you today. This one was inspired by Taylor Swift. In particular, the shoot she did with InStyle UK Which had my mouth drop open in awe of the gorgeousness. It's a more natural look ... really easy and only takes to the a little bit of eyeshadow since the focus is all in the liner. Here's the look and how it's done:

    Step 1: Highlight your brow bone with a light nude color shown in the swatch the.
    Step 2: Fill your entire lid with a darker nude. Mine's more of a salmon tone.
    Step 3: Brush a light greyish brown onto your crease on the inner area only. Blend it gently up towards your eyebrow.
    Step 4: With a darker brown, apply under your eye, keeping it soft.
    Step 5: Grab the brown eyeliner and apply under lower lashline and on your waterline.
    Step 6: Line your upper lid with a liquid liner. Usually Taylor does a slight wing the shown.
    Step 7: Add masks to your top lashes, and very sparingly on your bottom ones.
    Step 8: Apply the highlighter to your cheekbones, nose, and chin.

    Blogger : Sunrise
    Photo : source


    EVERYDAY NEUTRAL SMOKEY EYE TUTORIAL

    EVERYDAY NEUTRAL SMOKEY EYE TUTORIAL

    You might remember this from the tutorial while August It is my everyday neutral eyeshadow ... Some like to call it the "neutral smokey eye". Truth is, I wanted to redo it because I Actually redbourn Those other photos SO many years ago, before I even had this blog. Quite honestly, I think it needed an update because even though que tutorial has had about 100k pins on Pinterest, I hate the photos. So, here is a new fresh 2012 update! I simplified things for you too! Is it horrible que I pretty much still do my makeup the same way every day? I do not think so! Proves it works and is easy! Enjoy!

    Products used:
    Brow bone: Everyday Minerals eyeshadow in Bundled Up [similar here - in "Soul"]
    Ivory base: Too Faced "In The Buff" from the Naked Eye palette
    Brown shadow: Rock & Republic eyeshadow in Tribal [similar here - in "Buck"]
    Eyeliner: Rimmel Soft Kohl Eyeliner in Black
    Mascara: Rimmel Extra WOW Lash in Black Extra

    Blogger : Sunrise
    Photo : source


    SMOKEY EYE SUMMER MOSS MAKEUP TUTORIAL

    SMOKEY EYE SUMMER MOSS MAKEUP TUTORIAL

    Sometimes girls are afraid to try wearing brighter colors or bolder on Their eyes for fear of looking too wild, but here is a look que is great for trying out Those brights, while not going overboard. The trick is to combine your bright shades with a neutral, warmer color, like brown. This way, you still get that pop of color but it does not look too 'over the top'. With vibrant colors popping up all over the place this season, now is the perfect time to stray from your comfort zone a little bit and give this a try! Green Tends to work well on any eye color Which is why it's one of my favs! Here is how to get this look:

    1.Brush medium brown shade onto outer half of lid and into the crease. Continue onto bottom outer half as well.
    2. Using the green shade, brush onto middle of lid and extend to inner corner
    3. Continue the same green shade under eye, half way
    4. Darken outer corners and under eye with a deeper brown (on top of medium brown)
    5. Line upper lids
    6. Line waterline with white or nude eyeliner and finish with mask!

    I used the 88 Palette for the blueish green, and my Lorac palette for the Browns. Want a more natural look? Try my 5 minute makeup tutorial here, or my everyday eyeshadow tutorial .

    Blogger : Sunrise
    Photo : source


    Saturday, April 25, 2015

    8 TIPS FOR A CLEARER COMPLEXION

    8 TIPS FOR A CLEARER COMPLEXION
    I first started struggling with bad skin when I was about 14, and one day I showed up at school with a blemish under my left eye that was so big, one of my BFFs yelled, “OMG, what happened to your face?!”
    And then I punched her.
    Okay, maybe I didn’t, but I sure wanted to.
    The good news is that my skin has drastically improved since high school.
    The bad news is that I recent started experience breakouts again.
    So I reached back into the files in my brain and sifted through all of the things I learned when I was in my late teens/early twenties, and after a couple of weeks, I’m no longer embarrassed to leave the house.
    And since I’m a nice person, I decided to share my best tips for a clearer complexion with you.
    Because no one should ever look as bad as I did in the early 90s, you know?
    1. GET MORE SLEEP!
    My dermatologist told me about the link between sleep and acne when I was a senior in high school, but I always assumed my mother had slipped him 50 bucks to tell me that so I’d stop gabbing on the phone with Douche Rocket until the wee hours of the morning. So I ignored the advice and didn’t think about it again until I started to break out a few weeks ago. And guess what? My recent skin problems didn’t start until I was in the throes of my blog redesign and averaging less than 5 hours of sleep a night. And since I’ve been continuing on that trend for weeks on end, it’s no wonder I look like a hormonal teenager.
    2. CHECK YOUR BEAUTY PRODUCTS
    Have you recently started using a new foundation or brand of blush? What about your facial wash? Is it new? How about your hair? Are you spraying copious amounts of hair spray on it? All of these things can contribute to a sudden increase in blemishes, so be weary when you try new products, and only introduce one new item at a time so you can pinpoint if anything in particular is giving you problems.
    3. MOISTURIZE YOUR FACE!
    The last time I had a bad breakout was about 2 months before our wedding when I was juggling florists, caterers, photographers, and wedding dress fittings while also holding down a full-time job. I remember feeling intense fear that I would look like a monster when the big day finally arrived, so I headed on over to our local pharmacy on my lunch break one day, and the gal in the beauty section took one look at my skin and said, “you don’t moisturize, do you?” I was shocked that she thought I should be adding lotion to my disgusting skin, but I have been applying moisturizer to my face ever since and it has made a huge difference.
    Come to think of it, I ran out a few weeks ago, which may explain the sudden skin problems…
    2. CHANGE YOUR DIET
    I hate to break it to you, but anything that tastes good (think: refined carbs, fried foods, and chocolate) can cause you to break out. Don’t believe me? Then read Can Food Cause Acne? by YouBeauty.com and you’ll see why you need to throw the Ho Hos away and start snacking on celery sticks. Pronto.
    5. KEEP YOUR HANDS TO YOURSELF!
    A gal at a Proactiv booth taught me this trick. She had flawless skin, and when I asked what her secret was, she told me that she washed her face with regular soap and water, never applied any medicated creams to her skin, and never, ever, touched her face.
    And she emphasized the word “ever”.
    So before I took out a second mortgage to buy acne products that would dye all of our towels and bedding, I gave her trick a try, and I’ll be darned if it didn’t work!
    And let’s face it – with cold and flu season not quite over, you really shouldn’t be touching your face anyway.
    6. DRINK MORE WATER
    It’s no secret that water is the answer to all of our problems. It helps us lose weight. It boosts our energy. It makes us more regular. It flushes toxins out of our bodies. And it makes our skin look better.
    It also makes us pee a lot, which isn’t ideal after natural childbirth, but that’s a post for another time…
    7. STOP SUNBATHING
    I used to think sunbathing was the solution to bad skin because the moment I spent any time in the sun, my skin always cleared up.
    It was magical.
    But then a couple of days would go by, and the excess grease the sun exposure caused inevitably made my skin WORSE.
    And yet I never learned…
    8. HIT THE SHOWER AFTER A WORKOUT
    I don’t know about you, but I sweat like a man when I go to the gym, and if I go long stretches between workouts, I start to notice an increase in blemishes along my hairline and on my back. So I try not to slack on my gym routine, and I’m always careful to soap myself up as soon as I get home from a workout. Well, sometimes I shove a few handfuls of Cinnamon Toast Crunch in my mouth first, but that only takes a couple of minutes.
    Ten tops.
    Now, I’m sure there are a lot of other tips for a clearer complexion (like cutting out booze – gasp!), but these seem to be the key things that keep me from looking like a pubescent teen.


    Blogger : Sunrise
    Photo : source


    10 FABULOUS MAKEUP TUTORIALS TO TEACH YOU THE BEST KEPT SECRETS OF MAKEUP ARTISTS

    10 FABULOUS MAKEUP TUTORIALS TO TEACH YOU THE BEST KEPT SECRETS OF MAKEUP ARTISTS

    I have a confession to make.
    I spend an unhealthy amount of time watching makeup tutorials on YouTube.
    And I blame my mother.
    If she hadn’t let me parade around like a hooker in the 7th grade, I probably wouldn’t be as obsessed with trying to look normal.
    But that’s a post for another time.
    Anyway, throughout the many (many) nights that I have sat on this couch searching for the best tips and tricks to help me fool people into believing I’m not a troll, I stumbled upon Wayne Goss’s channel,gossmakeupartist.
    Have you heard of Wayne Goss?
    I love him.
    Not only does he break down the whole world of makeup into bits and bites that I can actually understand, but he is constantly sharing the best kept secrets of makeup artists.
    Oh, and he has his own line of brushes that I’ve been lusting after for months and months, which I hope someone will buy me for my birthday next year.
    (March 9th – mark your calendars)
    And after spending about 4 hours watching a bunch of his tutorials one night last week, I learned so many makeup secrets that have made such a difference in my morning makeup routine, that I had to share my favorites with all of you.
    You’re welcome!
    1. HOW TO GET YOUR FOUNDATION TO LAST ALL DAY
    If your foundation has a tendency to disappear from your face by the end of the day, give this trick a try. It goes against everything I’ve ever learned about applying dry make-up before wet make-up, but it really works!
    2. THE EASIEST WAY TO APPLY PERFECT EYELINER
    Want perfect eyeliner, but can’t seem to master how to apply it properly? Then this trick is for you. It took me a few tries to figure out, but it really does work!
    3. THE SECRET TO MAKING ACNE SCARS DISAPPEAR
    If the teenage years were unkind to you and left you with acne scars, this quick trick on how to smooth your skin and make acne scars disappear will change your life!
    4. THE TRICK TO MAKING YOUR NOSE LOOK SMALLER (OR BIGGER)
    This quick tip on the relationship between the positioning of your brow and the size of your nose has been a game changer for me. In fact, the first day I used this trick, someone actually stopped to tell me I have a nice nose. I’m not kidding.
    5. AN EASY WAY TO GET RID OF PUFFY BAGS UNDER YOUR EYES WITHOUT SURGERY
    I’m fortunate enough not to have puffy bags (yet), but I am amazed at how easy and effective this tip is. Give it a go and you will be amazed at how much it transforms your face!
    6. THE SECRET TO MAKING PORES DISAPPEAR WITHOUT FANCY CREAMS
    If you have large pores like I do, and find applying foundation can sometimes make them look MORE noticeable, this easy and awesome tip will give you that flawless look you’ve been looking for. It has made a HUGE difference in my look!
    7. THE TRICK TO BEAUTIFUL EYELASHES THAT LAST ALL DAY
    Not only does this mascara trick avoid clumping, but it enables you to get beautiful, curled lashes that last ALL DAY LONG!
    8. A SIMPLE TRICK TO GET YOUR EYE CONCEALER TO STOP CREASING
    An awesome, cheap, and EASY way to ensure your under eye concealer doesn’t crease. It works like a charm!
    9. THE SECRET TO FIXING EYESHADOW MISTAKES
    If you have a tendency of botching your eye shadow like I do, this trick will save your life!
    10. HOW TO COVER DARK CIRCLES UNDER YOUR EYES
    If you’re a tired mom like me, these tips for applying concealer are JUST what you need!

    Blogger : Sunrise
    Photo : source


    BEST FACE MASKS

    BEST FACE MASKS

    Ever since I was a child, I’ve associated face masks with a sort of feminine mystique. Perhaps because it’s a cliché in movies for a woman to “primp” or “unwind” with green goo smeared on her face, I always thought that taking a few minutes to relax while some magical potion works its wonders on your mug was kind of the ultimate in grown-up indulgence. And, if I’m being honest with myself, not much has changed.
    I still get that thrill of scooping out the product and applying it to my skin thickly and liberally, of taking a few moments to relax, and of getting a feeling (however brief) that I’ve done something really good for my skin, and for my stress levels. Hey, maybe it’s a cliché for a reason — I’m guessing that both you and your skin could use some TLC right about now, and what better way to feel refreshed than with one of these pretty picks?

    Blogger : Sunrise
    Photo : source

    THE BEST BLUSHES FOR GLOWING WINTER SKIN

    THE BEST BLUSHES FOR GLOWING WINTER SKIN

    Gray skies, harsh winds, slushy streets…no offense, winter, but you ain’t the prettiest season there is. Once we get to January, I start to feel like I’ve lost my luster entirely. (Hey, a girl can only endure so many nights that start at 4:30 pm before she starts to forget what a summer breeze feels like.) One’s instinct might be to layer on the bronzer and self-tanner in search of a bit of that long-lost summery color, but I always feel that trying to create a faux tan in the dead of winter is a losing game. My solution? Blush. Blush has always been one of my favorite product categories of all time. I mean, who can resist pretty powders, gels and creams in poppy shades of pink, red and coral? The tulips may not be out for a good few months, but that doesn’t mean that you can’t deck yourself out in the shades of spring right now! Click ahead for my favorite pretty potions, and let me know which one you decide to take for a spin!

    Blogger : Sunrise
    Photo : source